
Re-posted from old site. Original post: August 9, 2015
My game team requested that I make a way to connect a Google spreadsheet of tasks to Trello so cards could be made based on the data from the spreadsheet. This took a lot of tinkering and researching/learning the Trello API. In this post however I’m going to cover setting up the authorization code you need to start receiving and sending data to Trello. In future posts I can go into more detail about the full system I created.
Step 1: Create a Google App Script Project
See Step 1 from my previous post.
Step 2: Add the Open Authorization Library OAuth1
So in order to connect to the Trello API you need to use the OAuth1 library. In the past you could use the UrlFetchApp, but Google has since depricated the OAuth portions of this class. So to do this follow these directions in the Google libraries guide and use the library project key Mb2Vpd5nfD3Pz-_a-39Q4VfxhMjh3Sh48.
Step 3: Create an OAuth Service Object
The service object is what we use to communicate with the Trello API. You will use its fetch function combined with a specific URL (and if sending data a JSON object is used as well) to tell the Trello API what you want to do. You can remake this service object over and over again or pass it around among your functions.
Below is what the code should look like:
///////////////////////////////////////////////////////////
// Name:   createOAthService_Trello                      //
// Desc:   Uses OAuth1 class to setup a connection to    //
//         Trello                                        //
// Params: None                                          //
// Return: the object to send/recieve data through       //
///////////////////////////////////////////////////////////
function createOAthService_Trello() {

  var service = OAuth1.createService("trello");
  service.setAccessTokenUrl("https://trello.com/1/OAuthGetAccessToken");
  service.setRequestTokenUrl("https://trello.com/1/OAuthGetRequestToken");
  service.setAuthorizationUrl("https://trello.com/1/OAuthAuthorizeToken?scope=read,write");
  service.setPropertyStore(PropertiesService.getScriptProperties());
  service.setCallbackFunction('authCallback_Trello');
  service.setConsumerKey(consumerKey);
  service.setConsumerSecret(consumerSecret);

  return service;
}
There are two things here though that you will need to get from Trello through your account. They are the Consumer Key and the Consumer Secret. To get these log into Trello, and then visit https://trello.com/1/appKey/generate.
One of these lines of code sets a Callback function. Therefore you’ll need to make a Callback function as well otherwise it will give you errors when you run your program. Here is what my Callback function looks like:
///////////////////////////////////////////////////////////
// Name:   authCallback_Trello                           //
// Desc:   Callback function for when user needs to      //
//         authorize application with Trello             //
//         (the contents are not specific to Trello)     //
// Params: None                                          //
// Return: HTML message of succes or failed              //
///////////////////////////////////////////////////////////
function authCallback_Trello(request) {

  var service = createOAthService_Trello();
  var isAuthorized = service.handleCallback(request);

  if (isAuthorized) {
    return HtmlService.createHtmlOutput('Success! You can close this page.');
  }
  else {
    return HtmlService.createHtmlOutput('Denied. You can close this page');
  }
}
Also note this function calls the previous function we made createOAthService_Trello, this is fine and shouldn’t create any issues with recursion.
Step 4: Using Your Service Object
At this point you have the code you need to establish a connection, but before we can have our program interacting fully we need to run it once to get the Authorization message from Trello. (Basically it says that you allow this application to use your account for 30 days). I packaged this into a function so it’s easy to just call at the beginning of my program.
///////////////////////////////////////////////////////////
// Name:   checkServiceAccess                            //
// Desc:   Sets up access to Trello and ensures this app //
//         has authorization                             //
// Params: None                                          //
// Return: the service to send and recieve data through  //
///////////////////////////////////////////////////////////
function checkServiceAccess(){
  var service = createOAthService_Trello();

  if(service.hasAccess()){
    return service;
  }
  else {
    var authorizationUrl = service.authorize();
    MailApp.sendEmail(emailAddress, 'App Needs Authorization (Trello)', 'Please visit the following URL and then re-run the script: ' + authorizationUrl);
    Logger.log('Please visit the following URL and then re-run the script: ' + authorizationUrl);
  }
}
This way it will check whether or not I have access to Trello. If I do it will send me back the service object so I can use it otherwise it will log the URL I need to go to in order to authorize my application (I also have it email me since I use these functions via triggers so in that case I won’t be able to access the Logger). So if I use this system for the next 8 months of our project class, once a month I’ll have to go and re-authorize the app (which is unavoidable according to what I’ve read from the Trello API).
The link usually brings you to a screen that looks like this:
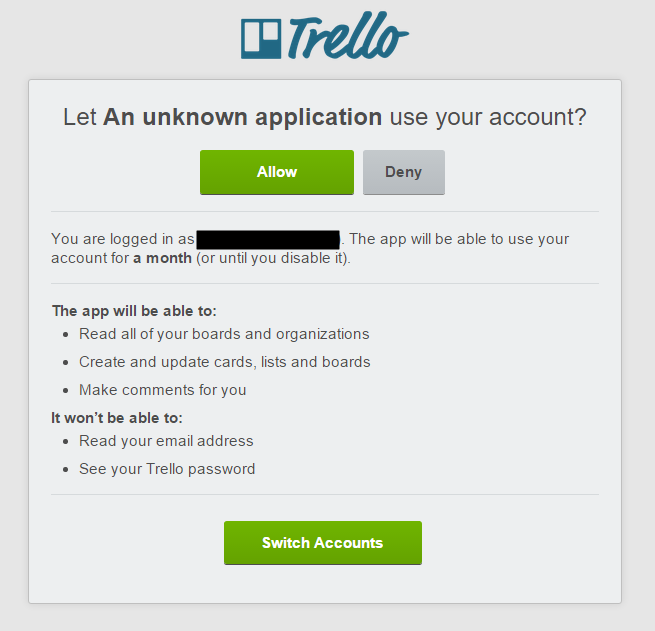
If you are running your program for the first time you might also have to go through Google’s authorization (it’s pretty standard with Google App Scripts and will automatically pop up).
Step 5: Start Receiving Data from Trello
So now we are all connected and just need to start asking Trello to send us things (I’ll cover telling Trello to create things in a different post).
Below is a sample of how to use the service object’s fetch method to receive data.
///////////////////////////////////////////////////////////
// Name:   getBoardsInOrganization                       //
// Desc:   Gets all the boards in an organization and    //
//         puts them into an array                       //
// Params: service - object to send/recieve data through //
//         orgName - name of the organization to get the //
//                   boards from                         //
// Return: an array of board name/id pairs               //
///////////////////////////////////////////////////////////
function getBoardsInOrganization(service, orgName){

  // Get the list of boards (and their info) from Trello
  var url  = "http://api.trello.com/1/organizations/" + orgName + "/boards";
  var raw  = service.fetch(url);
  var data = JSON.parse(raw);
  Logger.log(data);

  // Make an object pair of board name and id and add to array of boards
  return makeArrayFromData(data, ArrayType.eBOARD);
}
The basic concept is that depending on what information you want you use a specific URL. Then you call service.fetch(URL) and that should give you back a string. Use the JavaScript JSON parser to put it all in an object. Logging this data will allow you to see exactly what you get so you can then go on to access it though something like data.boards (which is an array) and loop through all the boards in the organization.
Here is a list of some URLs you may find useful:
//  Get the boards in an organization                : "http://api.trello.com/1/organizations/" + orgName + "/boards"
//  Get all the lists on a specific board            : "http://api.trello.com/1/boards/" + boardId + "/lists"
//  Get all the cards on a specific board            : "http://api.trello.com/1/boards/" + boardId + "/cards"
//  Get all the cards on a specific list             : "http://api.trello.com/1/lists/" + listId + "/cards"
//  Get a specific card (can access checklists here) : "http://api.trello.com/1/cards/" + cardId
//  Get all the members of a specific board          : "http://api.trello.com/1/boards/" + boardId + "/members"
//  Get a specific board (can access labels here)    : "http://api.trello.com/1/boards/" + boardId
So that’s it. That should get you started. If you have any questions feel free to leave a comment.
I would also like to credit a fellow DigiPen student (now alumn) Riley Pannkuk. His blog post helped me get a good starting point. A link to that post is here.
Also on a side note you can use this setup to access other things as well. One example is Twitter. You just need to know the correct links for the OAuth1.createService stage.


